Git Sync is a bi-directional integration between your Hightouch workspace and a Git repository. It brings all the benefits of version control to your Data Activation workflows. For example, it lets you:
- Use code to create and edit multiple Hightouch models and syncs simultaneously
- Create commit logs of incremental changes
- Roll back your models and syncs to a previous state
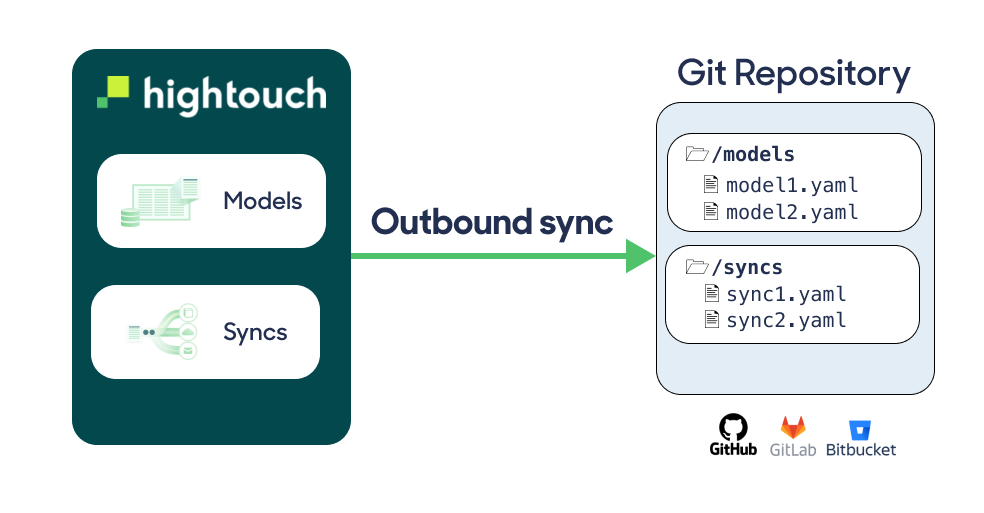
When enabled, Git Sync saves updates to models or syncs made in the Hightouch UI to YAML files in a Git repository. The extension marks changes made in the Hightouch UI as OUTBOUND. Each update to a model or sync also becomes a commit in your designated repository.
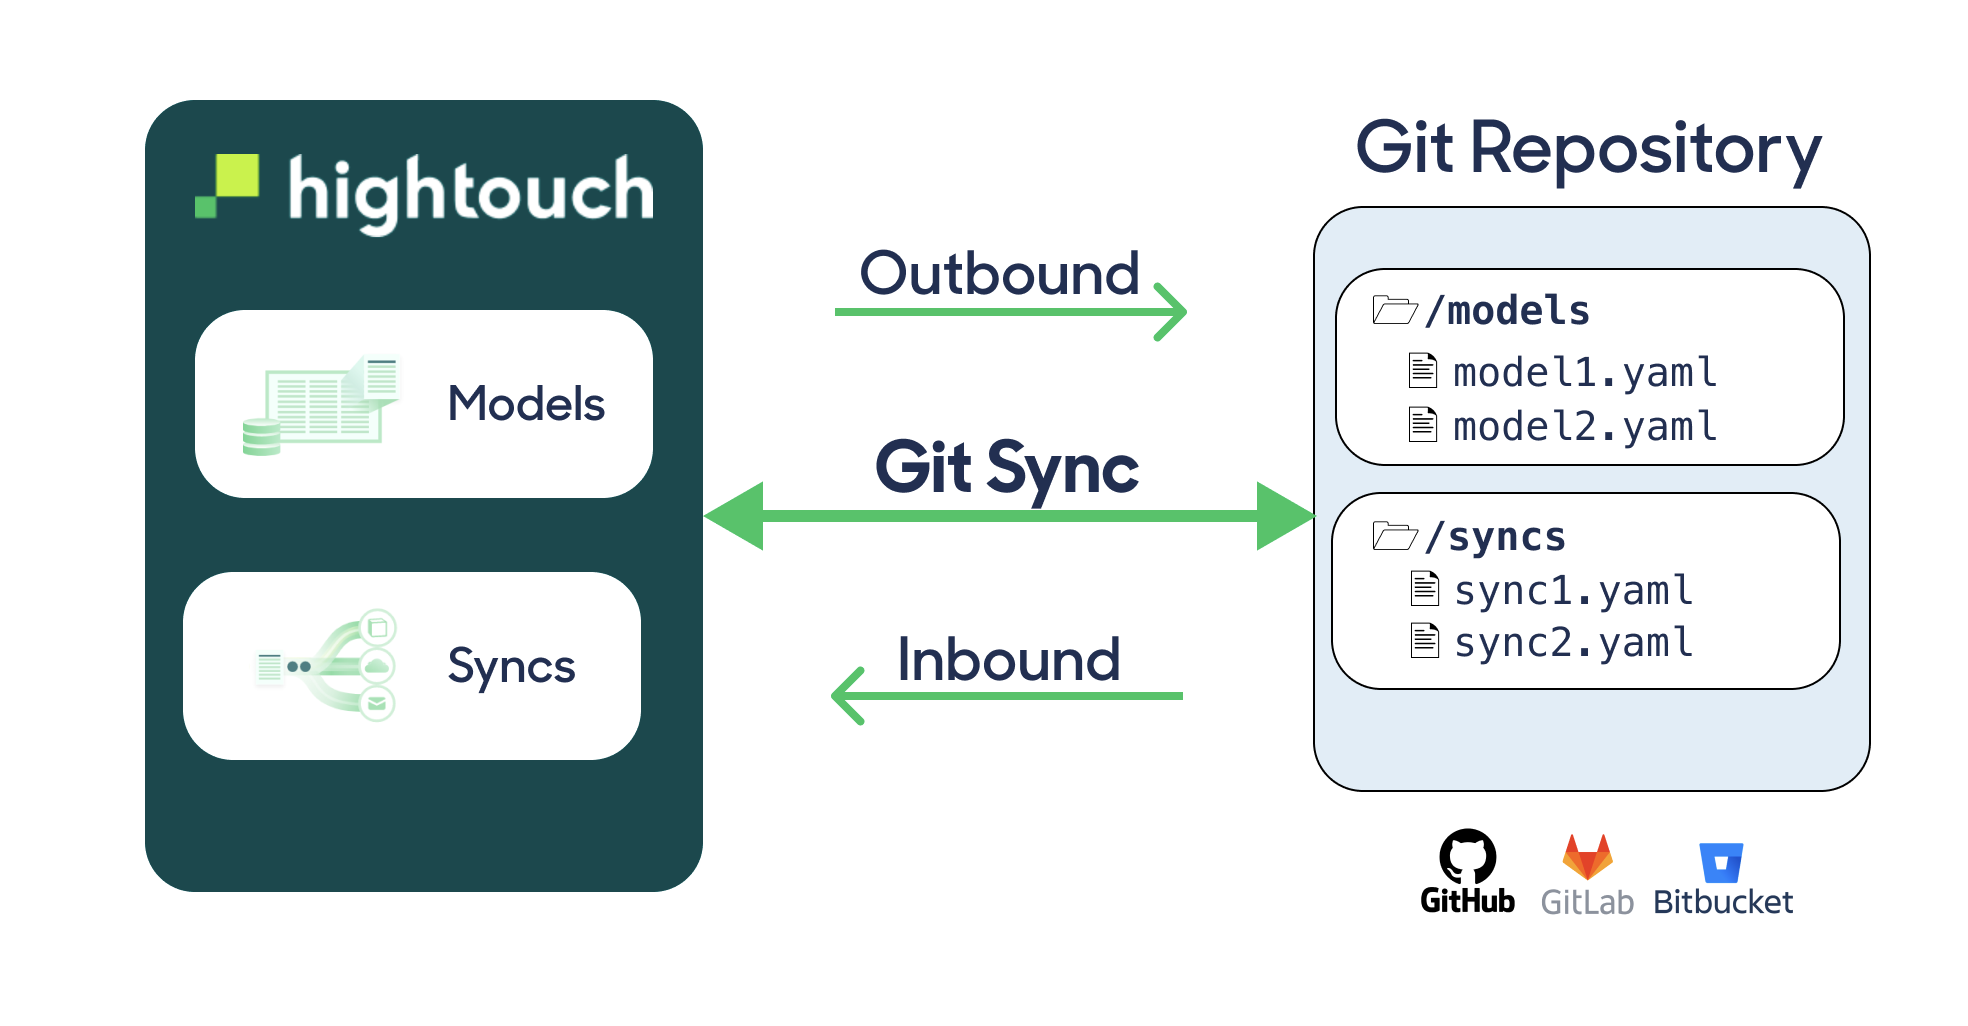
The sync also works in the opposite direction. Any changes you make to the YAML files—including making new YAML files—updates or creates resources in Hightouch as if you made them in the UI. The extension marks these as INBOUND.
Inbound changes made in your Git Sync repository don't require approval from another team member if your workspace is using approval flows.
Git Sync supports virtually all Git providers, including GitHub, Bitbucket, GitLab, and private on-premise repositories. Regardless of direction, the extension pushes changes between the Hightouch UI and Git repository in about one minute.
Hightouch can communicate with two distinct Git repository types. The Git Sync feature interacts with a Git repository to version control your Hightouch settings. This is separate from Git repositories used to leverage dbt models.
Setup
You must complete three steps to use Git Sync:
- Create a Git repository—if you don't already have one—to store your schema files. GitHub repositories started from scratch are the easiest to work with, as they can make use of the Hightouch GitHub bot.
If you create an empty repository, make sure you also make an initial commit, for example, creating a README file, so that a branch exists.
- Authenticate Hightouch access to your Git repository.
- Configure Git Sync for your workspace.
Authenticate to Git
Once you have a repository, you can configure your Git credentials in Hightouch. Go to the extension configuration tab and click Set up under Configuration > Git credentials.
If you're using GitHub, it's best to use Hightouch's GitHub app for the most up-to-date feature support.
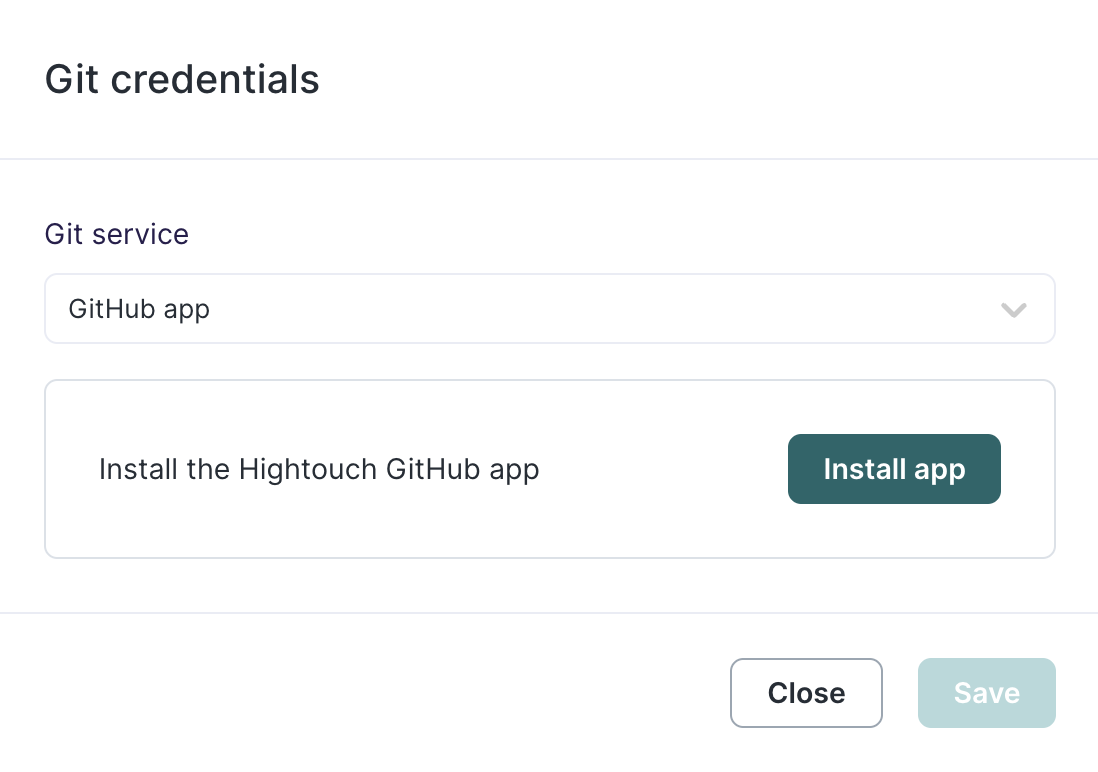
Regardless of how you connect to your Git provider, you need to provide permissions to the particular repository or repostiories Hightouch should have access to.
Authenticate to a GitHub Enterprise repository
If you're using GitHub Enterprise with a self-hosted server, select Other under Git service.
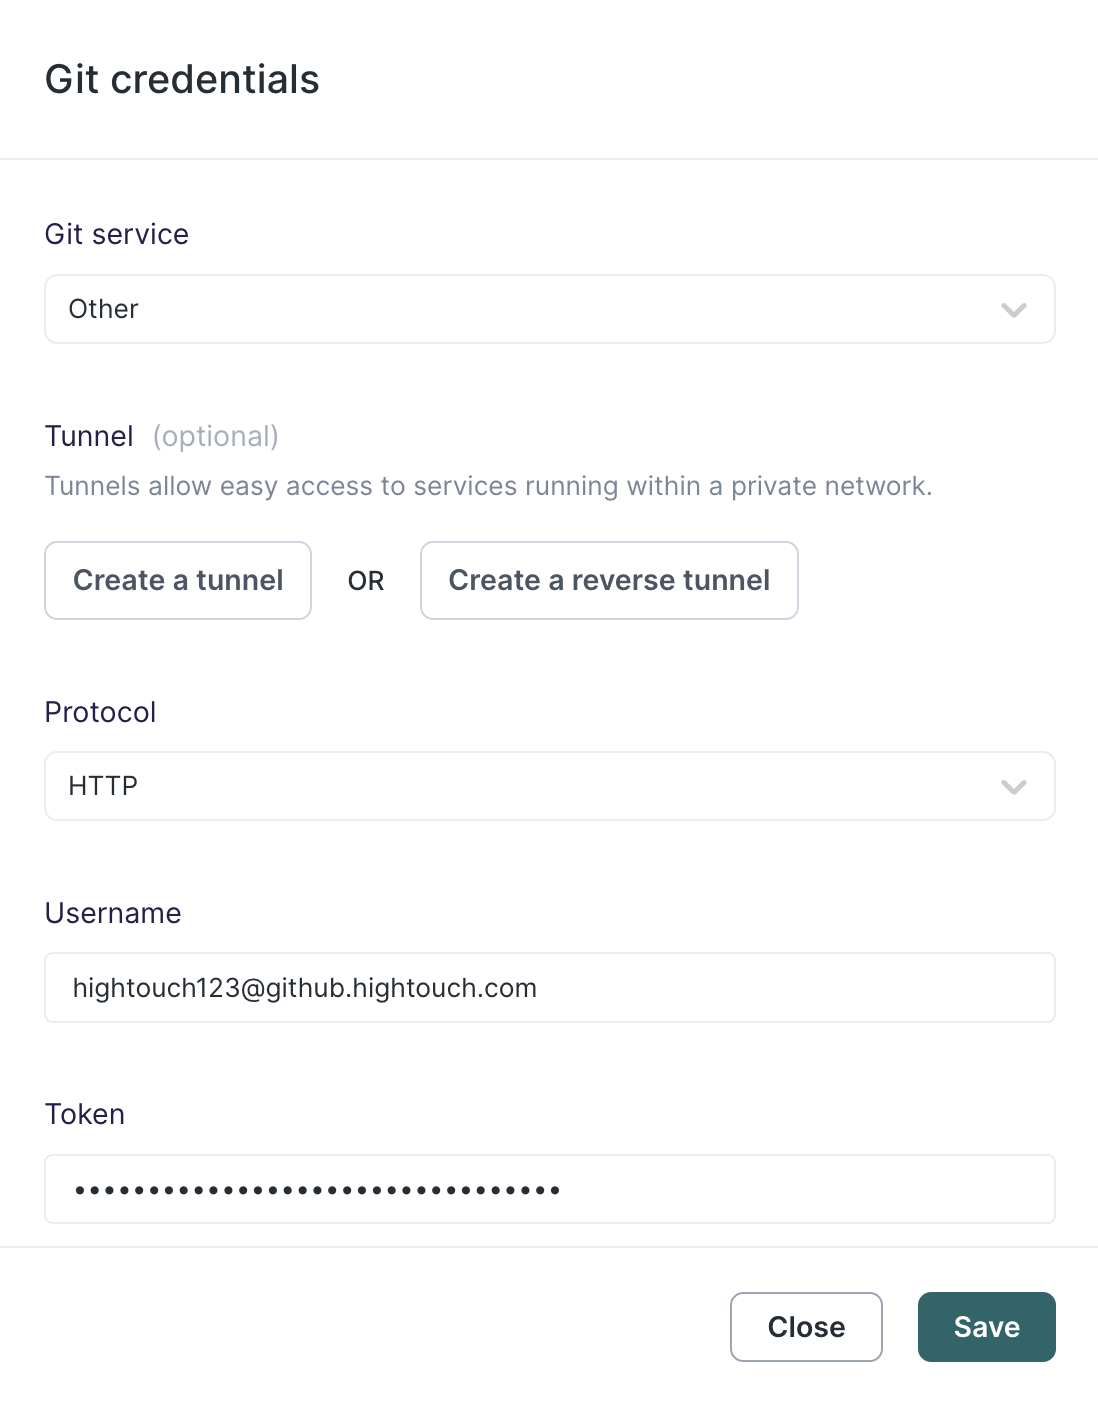
For Username, enter your full GitHub Enterprise username which may look like something like "hightouch123@github.hightouch.com." For Token, enter a GitHub access token tied to the username you entered.
Be sure the token provides access to the particular repository or repostiories Hightouch should have access to.
Authenticate to a AWS CodeCommit repository
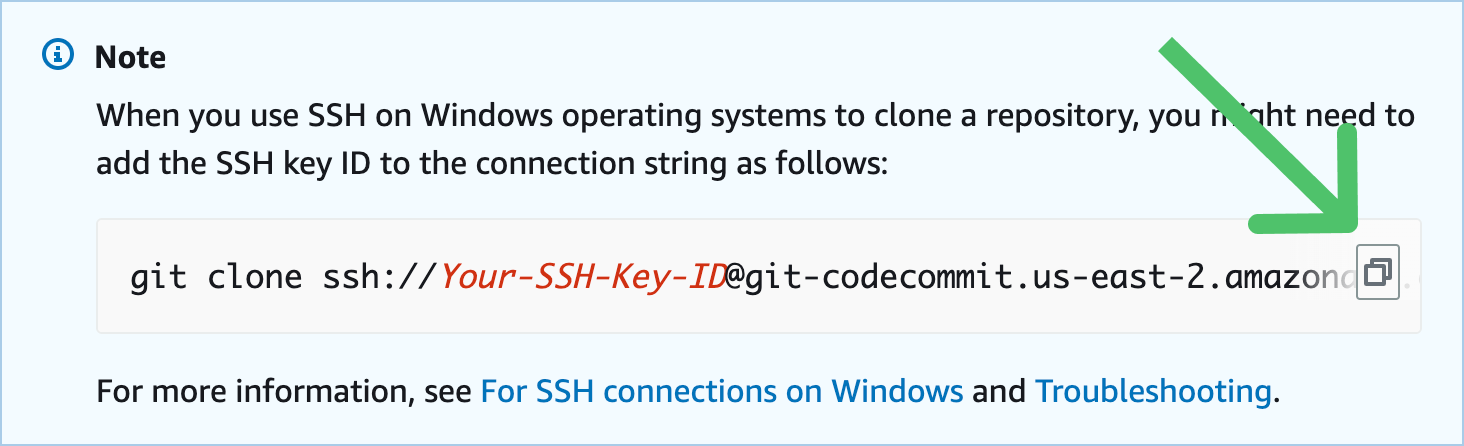
If you use AWS CodeCommit to host your Git repositories, you must use SSH to authenticate to Hightouch.
- Configure your AWS CodeCommit repository for an SSH connection by following these instructions.
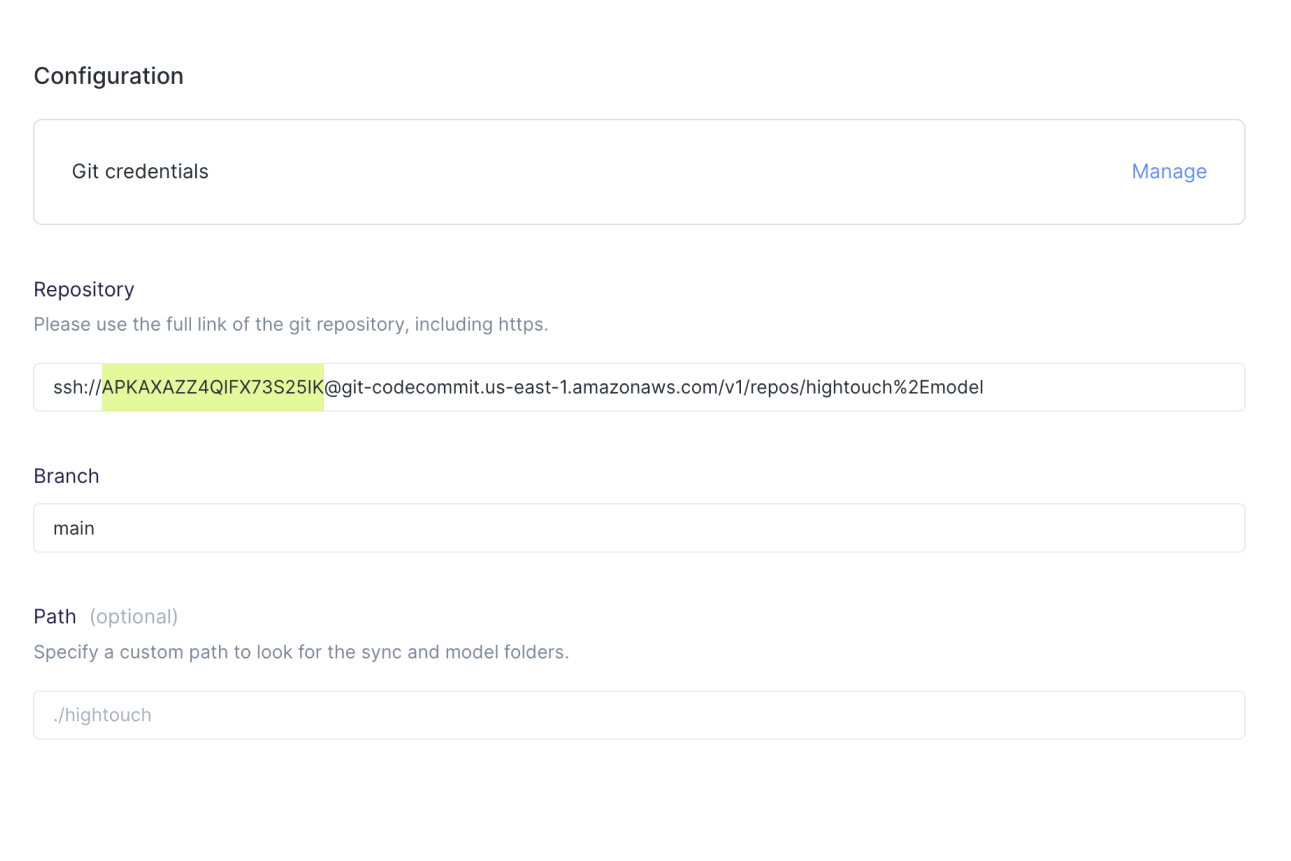
- In Hightouch, select Other as the Git service and SSH as the Protocol.
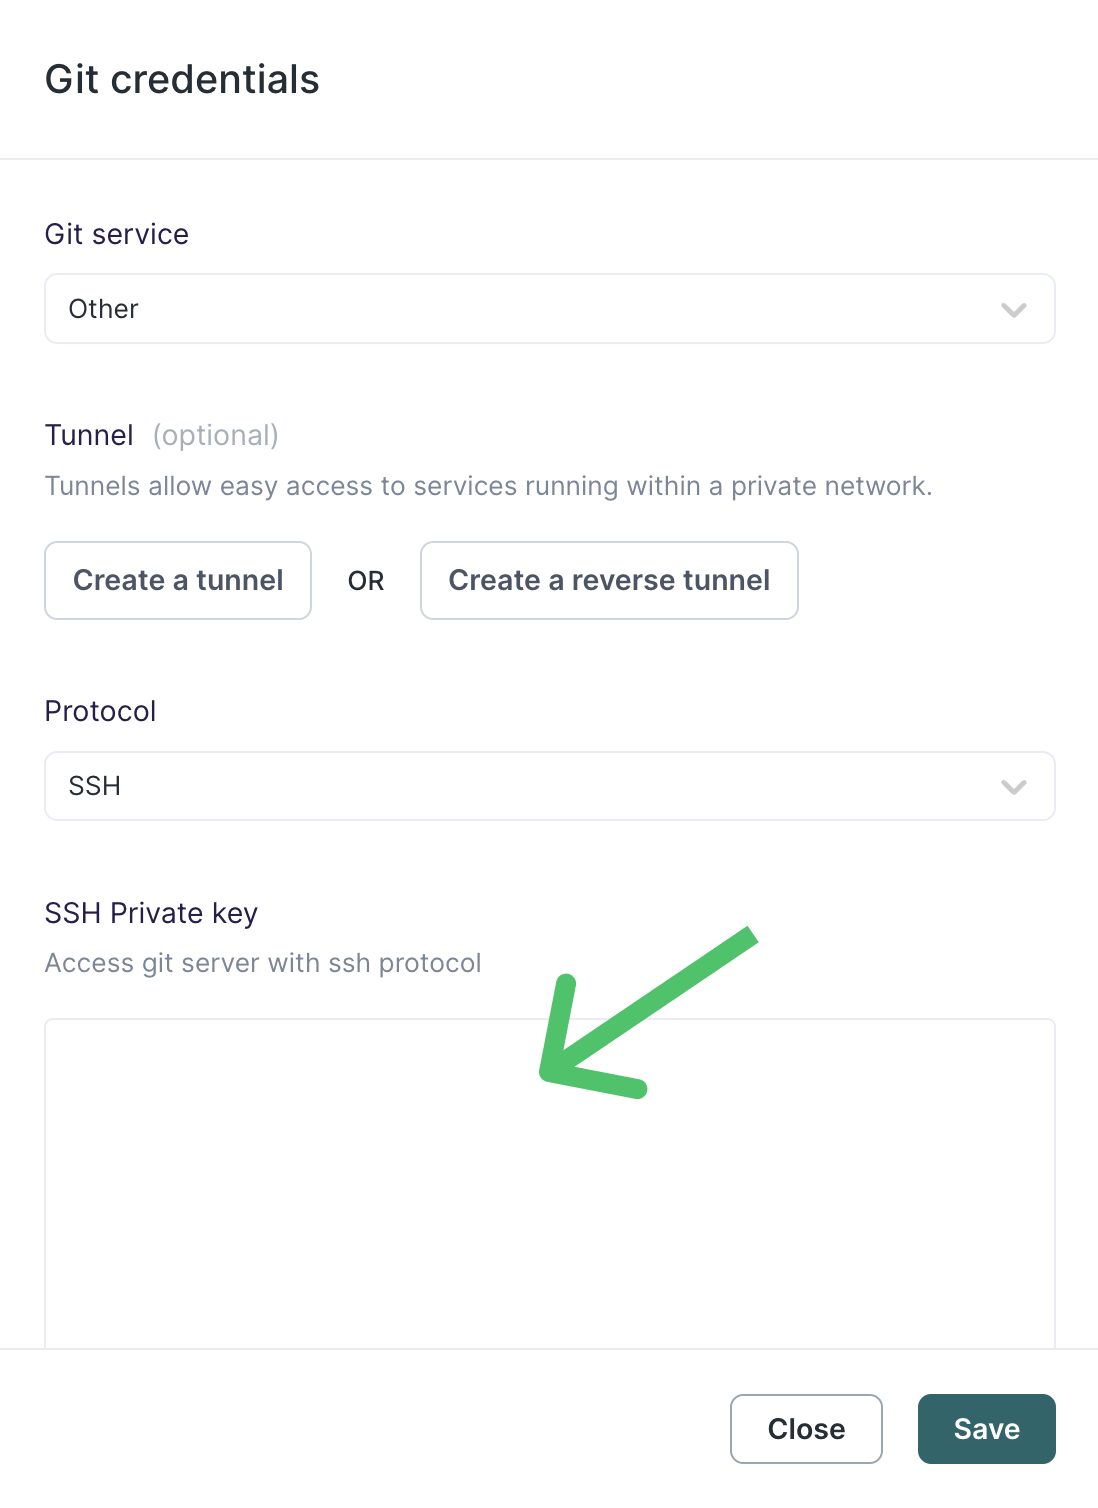
- Enter the private key you generated when configuring AWS CodeCommit repository under SSH Private key. Click Save.
- For the Repository, enter the full SSH URL including AWS SSH Key ID. This key is different than the generic Access keys in your AWS account.
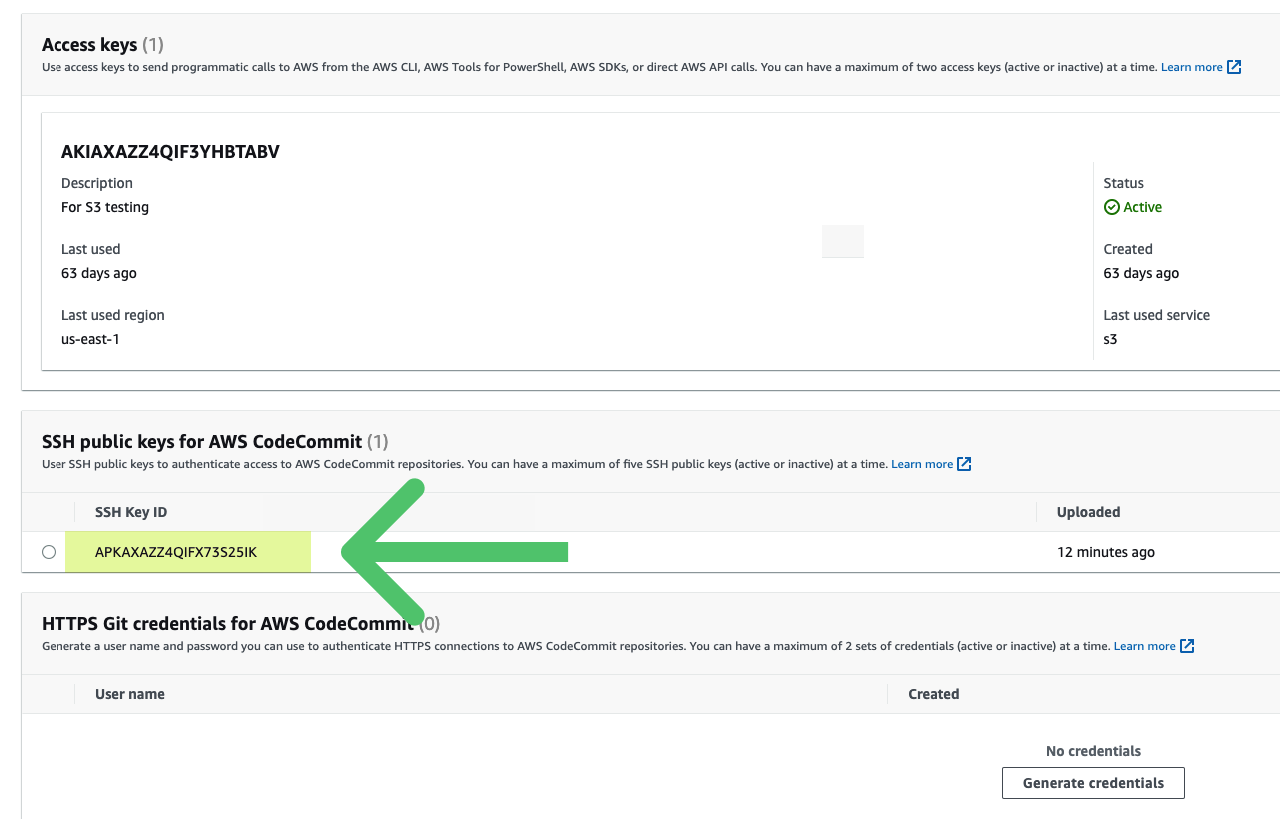
You can copy your URL from these instructions in AWS's docs.
Configure Git Sync
Last, you need to enable and configure Git Sync for your workspace. Go to the Git Sync Configuration tab on the Extensions page and select the Repository and Branch where you'd like changes saved to and read from.

Optionally, enter a Path where the integation should create the sync and models folders.
For example, the preceding screenshot configures saving changes to a ./hightouch subfolder.
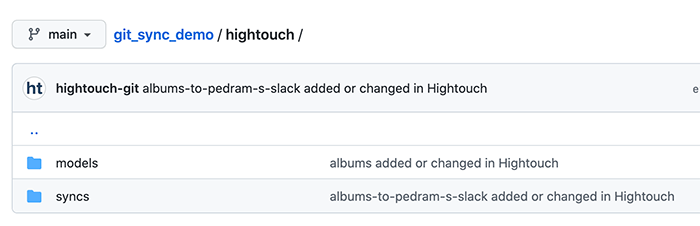
Hightouch creates folders for syncs and models within this subfolder. If you don't enter a path, it saves them in the root of your Git repository.
To save your Git Sync configuration, click the Save button on the right side. After clicking save, Hightouch creates the subfolder if needed. The extension then processes the bi-directional sync from Hightouch to Git and vice-versa. Specifically, the extension starts writing your models and syncs as YAML files to your repository. If you create any new models or syncs in the repository, the extension creates them in Hightouch.
To begin the syncing process immediately, click the Full Resync button. This action pushes all workspace syncs and models to Git and then pulls changes from Git back to your workspace, in that order. This may overwrite changes in Git that have not yet been synced to Hightouch. For more information, please check the FAQ section.
For safety reasons, the extension doesn't support deletions from Git. If you delete a YAML file in Git, the corresponding model or sync remains in Hightouch. The file won't be rewritten to Git until the next change in Hightouch, or unless you trigger a full resync.
Using Git Sync with branch protection
If you use branch protection to protect your branches from unauthorized pushes and/or require pull requests before merges can happen, you need to grant bypass access to the Hightouch Connect app. The Hightouch Connect app is only able to push to your branch if it is added to the bypass list under rulesets.
In Github, go to 'Settings' -> 'Rules' -> 'Rulesets' and add the Hightouch Connect app to the 'Bypass list'. Configure the ruleset to disallow the actions you'd like to restrict.
In Github, there are two places where you can enforce branch protection, either in 'Settings' under 'Branches' or under 'Rulesets'. The Hightouch Connect app only works if you add it to the 'Bypass list' under 'Rulesets' and have the rest of your branch protection conditions defined under 'Rulesets'. It does not work as a 'force push' app under 'Branches'.
Schemas
You can expect the YAML files in your Git repository to use the following schemas.
Model schema
Models have a consistent schema:
name: > the model name/slug. unique per model
source: > the name/slug of the source. the slug is visible on the source page
type: > one of: raw_sql, table, or dbt_model
dbtModel: > null or the name of the dbt model to select, written as `model.<package_name>.<model_name>`
rawSql: > null or the sql to use, for example, select * from albums
tableName: > null or the table name to use
isSchema: > used internally by Hightouch, this should always be false
primaryKey: > primary key column for this model, for example, album_id
Sync schemas
The schema for syncs is destination-dependent. For this reason, it's best to initially create syncs within the UI. You can then use the schema created in Git Sync to update syncs or create new ones. The name of the YAML file is the name of the sync.
model: > model name/slug for this sync.
destination: > destination name/slug for this sync
config:
    > destination dependent configuration for this sync.
schedule: > type of schedule to use. the format here varies based on the
            schedule selected, we recommend using the UI as a starting point.
schedulePaused: > boolean, where this sync is paused, or enabled.
Based on the boolean value assigned to schedulePaused, your sync will either be enabled or disabled.
Manifests
Hightouch creates a manifest file at the root of your Git repository for each connected workspace. Manifest files list all sources and destinations in a workspace, making it easier for you to find their IDs to add to sync and model files or reference in aliases.
Manifest filenames follow this format: manifest-<your-workspace-id>.yaml. A manifest file follows this format:
# READ ONLY FILE
# Changes made here will be ignored. Please use the Hightouch dashboard to create and edit sources and destinations.

sources:
  production-postgres:
    name: Production postgres
    type: postgres
   snowflake-243-tenant:
    name: Snowflake EU instance
    type: snowflake
destinations:
  production-salesforce:
    name: Production Salesforce
    type: salesforce
Sources and destinations are listed by their ID. In the example file above, the Postgres source's ID is production-postgres and the Salesforce destination's ID is production-salesforce.
Manifest files are read-only. Git Sync overwrites any changes made to manifest files. Use the Hightouch dashboard to create and edit sources and destinations.
Aliases
Managing multiple Hightouch workspaces from the same Git repository can be difficult because source and destination IDs can differ between workspaces. Alias files let you create custom IDs for sources and destinations in a given workspace allowing model and sync files to work across different workspaces.
Hightouch creates an empty alias file in your Git repository for each connected workspace. Alias filenames follow this format: aliases-<your-workspace-id>.yaml.
You can then add sources and destinations to the alias file following this format:
# e.g. aliases-hightouch-production-workspace.yaml
sources:
   my-source-alias: my-actual-source-id
   othersourcealias: another-workspace-source
destinations:
   my-destination-alias: existing-destination
Each key is an alias and each value should be an actual source or destination ID. You can find source and destination IDs in the manifest file in the root of your Git repository.
Aliases should be unique across sources and destinations in the same workspace. In other words, you can't use the same alias for multiple resources in the same alias file.
Example alias usage
Consider a workspace, acme-staging, with a model stocking-list.yaml file like this:
name: Stocking list
source: staging-postgres
type: table
tableName: public.workspaces
isSchema: false
primaryKey: id
Another workspace called acme-production is connected to the same repository but can't use this model during Git Sync. That's because the acme-production workspace doesn't have a source with the ID staging-postgres. Instead, acme-production uses a Postgres source with the ID production-postgres.
You can use aliases so that both workspaces can use the same model stocking-list.yaml file.
- Add an alias to the
acme-stagingworkspace alias file:
# aliases-acme-staging.yaml
sources:
   aliased-postgres: staging-postgres
This creates the custom ID aliased-postgres that points to the source with the ID staging-postgres.
- Add an alias to the
acme-productionworkspace alias file:
# aliases-acme-production.yaml
sources:
   aliased-postgres: production-postgres
This creates the custom ID aliased-postgres that points to the source with the ID production-postgres. For the next step, it's important that both alias files use the same alias name. Since these aliases exist in different workspaces, they are still unique within their respective workspaces.
- Update the
sourcevalue ofstocking-list.yamltoaliased-postgres.
name: Stocking list
- source: staging-postgres
+ source: aliased-postgres
type: table
tableName: public.workspaces
isSchema: false
primaryKey: id
Now, during Git Sync, both workspaces resolve aliased-postgres to their respective Postgres slugs and Git Sync completes for both staging and production workspaces.
Validating changes
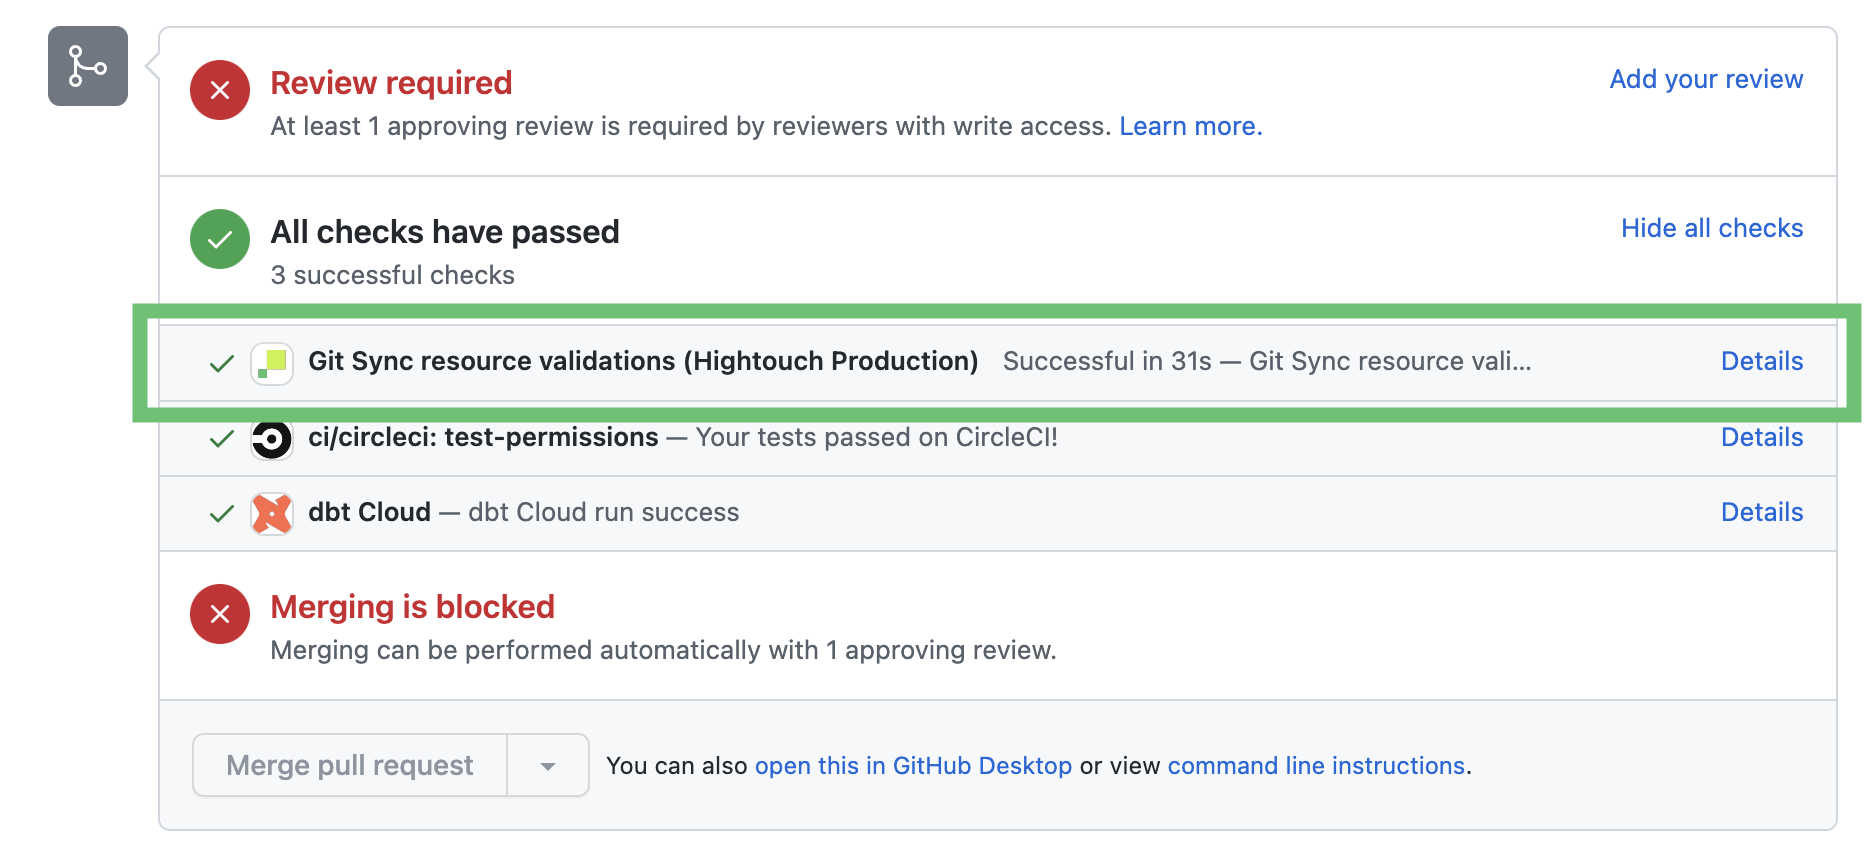
You can use Hightouch's CI checks to validate changes in your Git Sync linked repository. This feature checks your pull requests to ensure they don't break any existing syncs in Hightouch. To enable this, toggle on GitHub Pull Request checks in your Git Sync configuration page.
Once enabled, Hightouch runs a CI check on any pull request made to the connected Git repository. If a breaking change is detected—for example, deleting a model used in a sync—the CI check fails. Clicking into the details of a failed CI check shows which sync the breaking change effects.
The CI check passes if the pull request doesn't affect any Hightouch syncs.
Changelog
While Git Sync provides a changelog through commit history, you can also view audit logs for an in-app changelog.
You can use your Git repository as a changelog to track which user created or modified which resource.
A user's Hightouch email must match their GitHub email to show the correct user who created or edited resources.
For example, you can see the list of commits, when they were made, and who made them, by going to the repository's Commits tab or History.
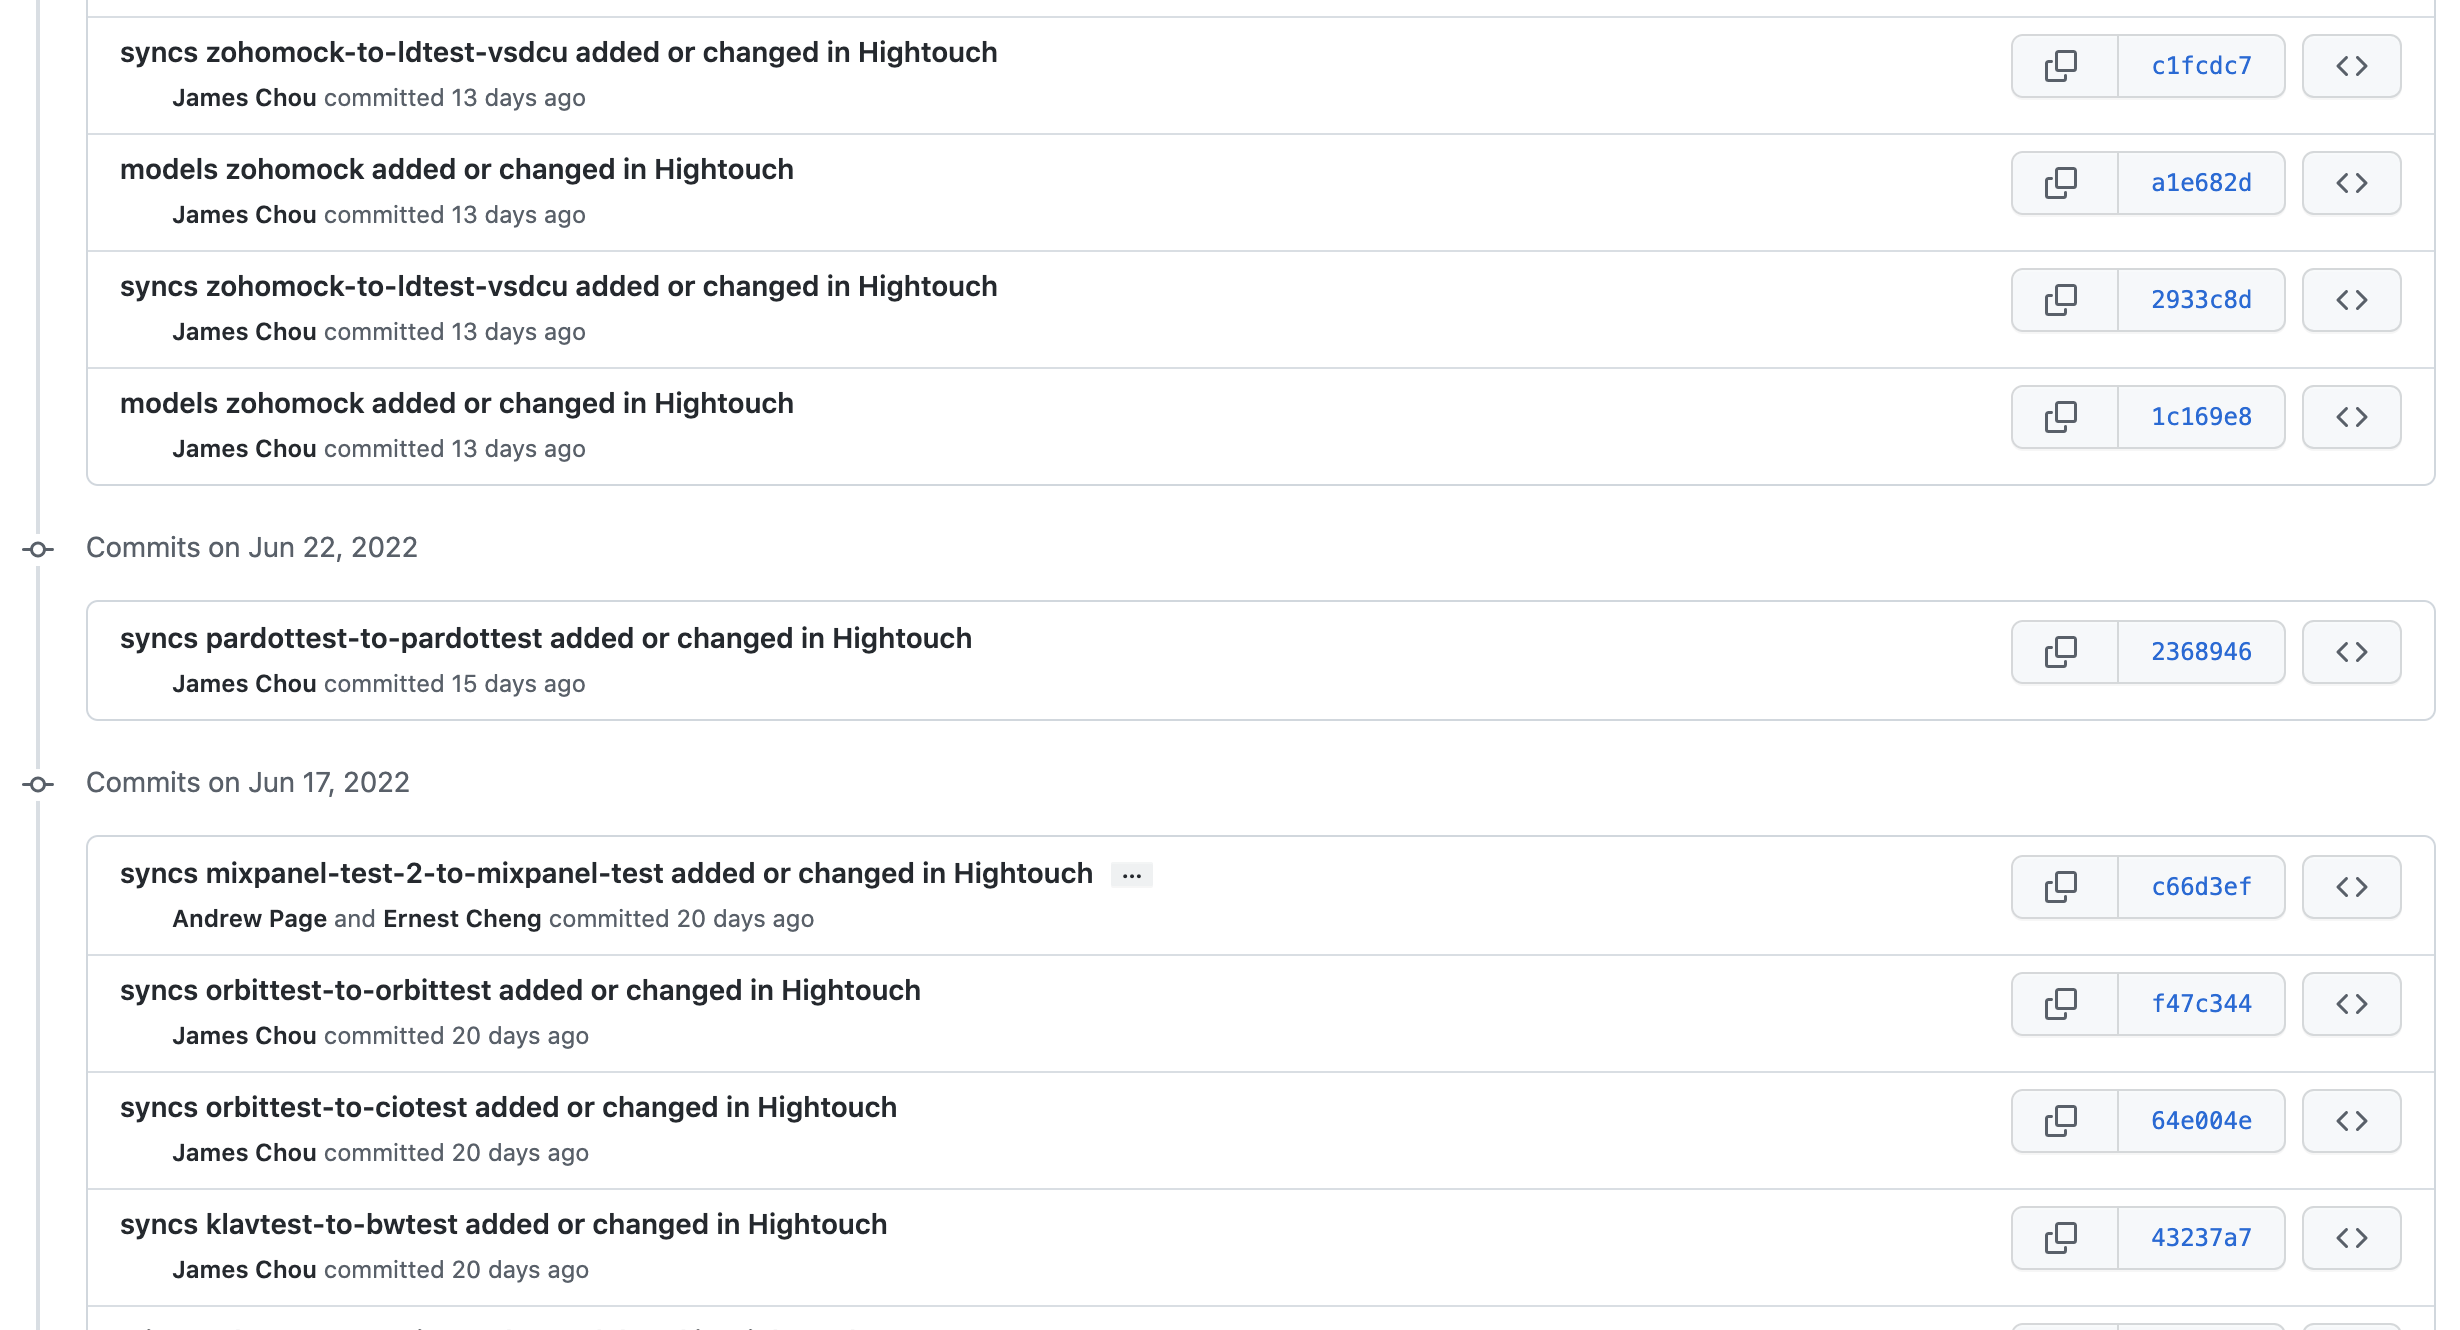
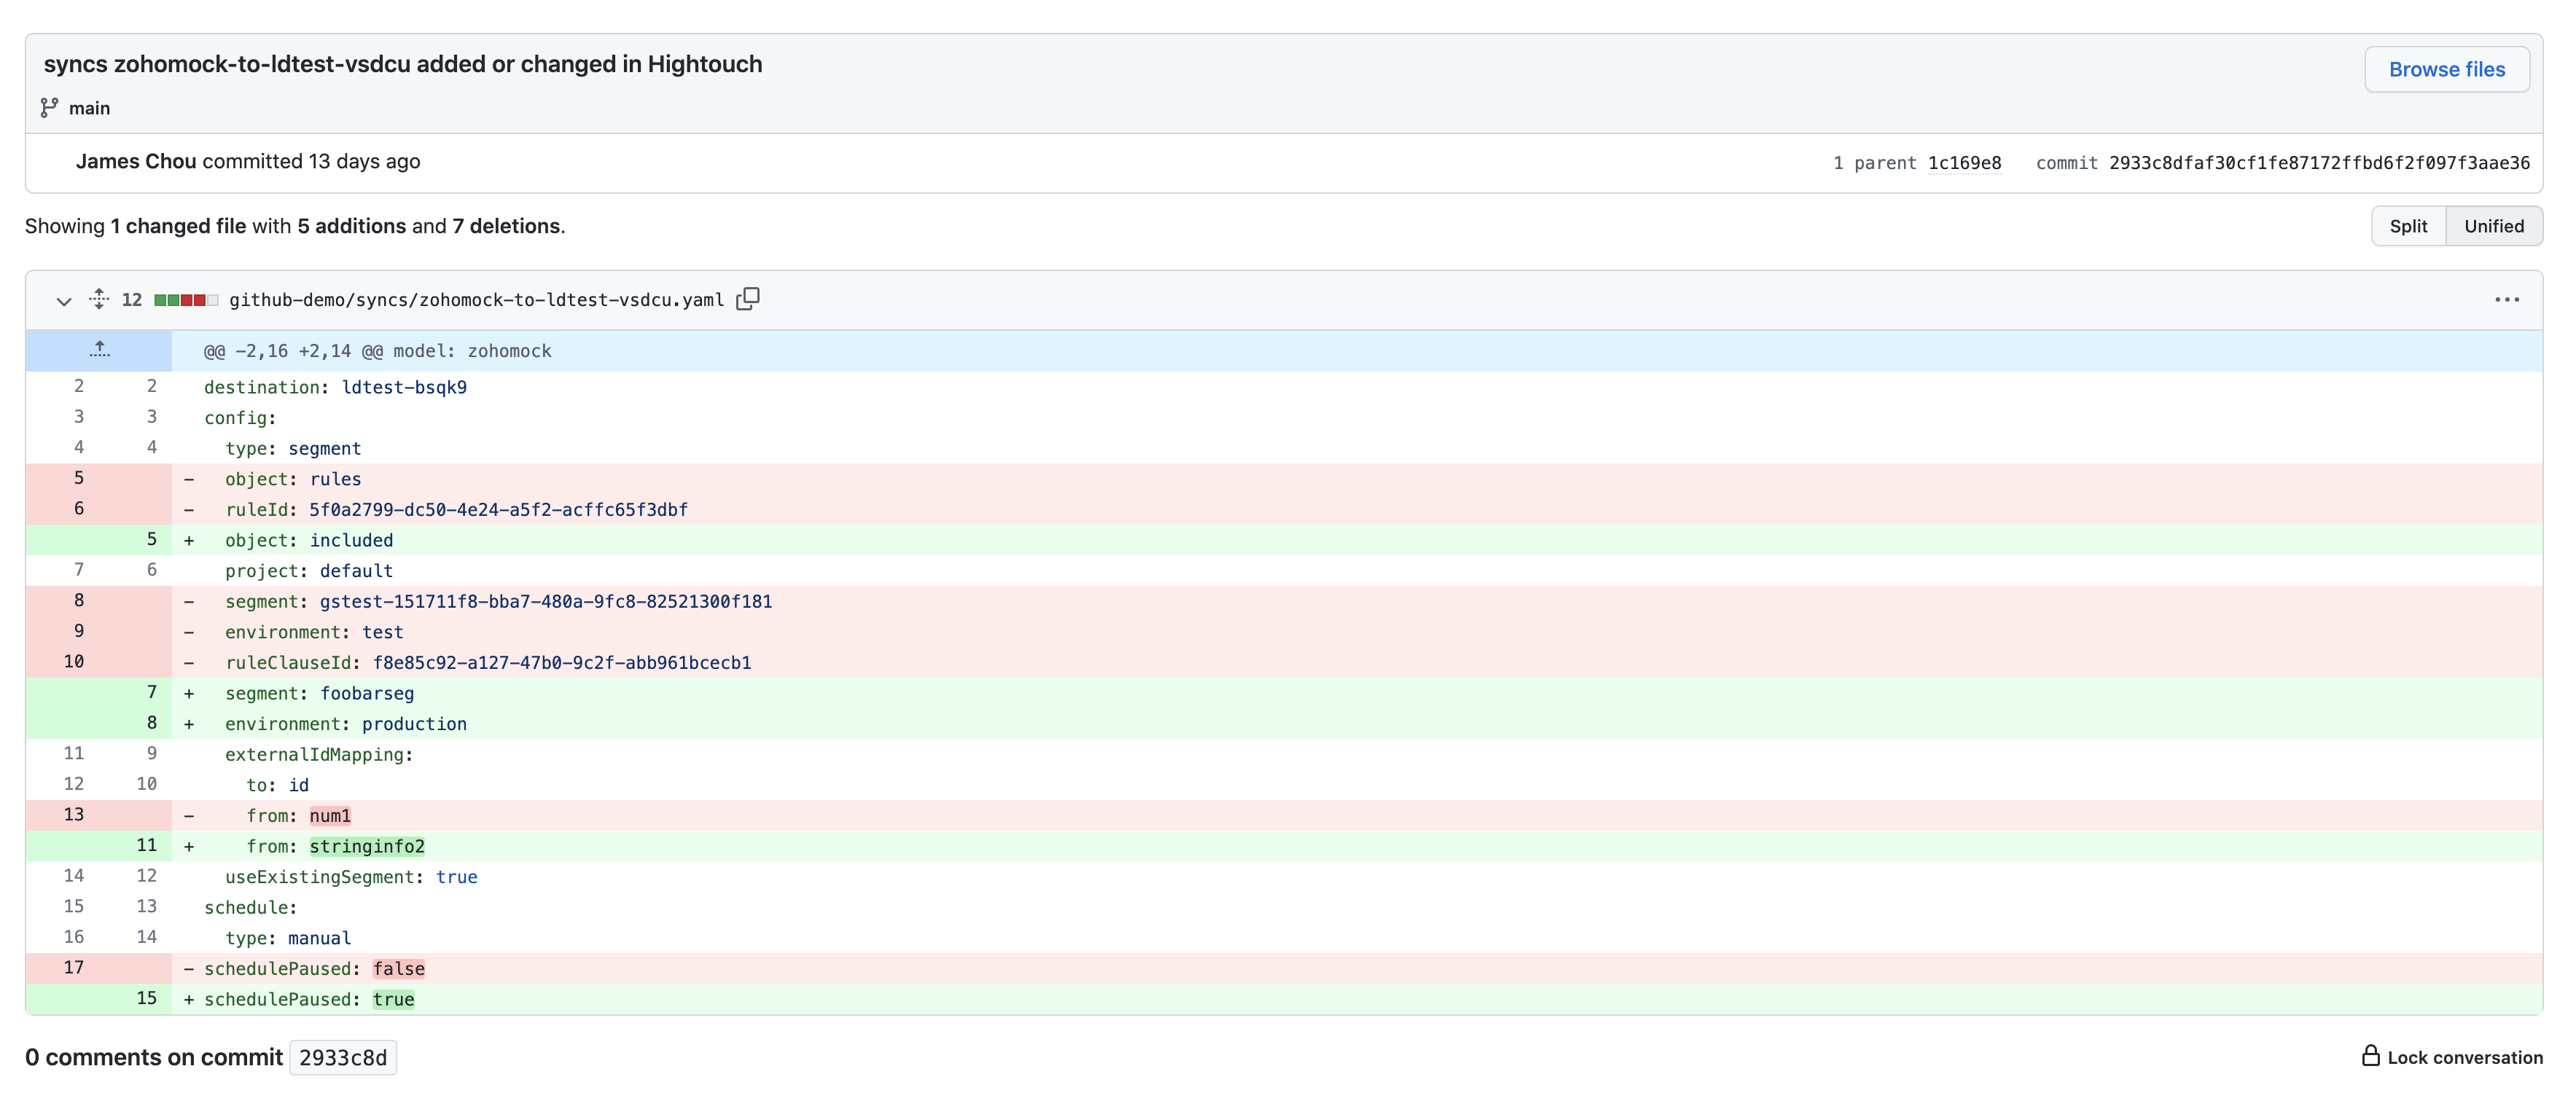
By clicking on a single commit, you can see the exact changes line-by-line.
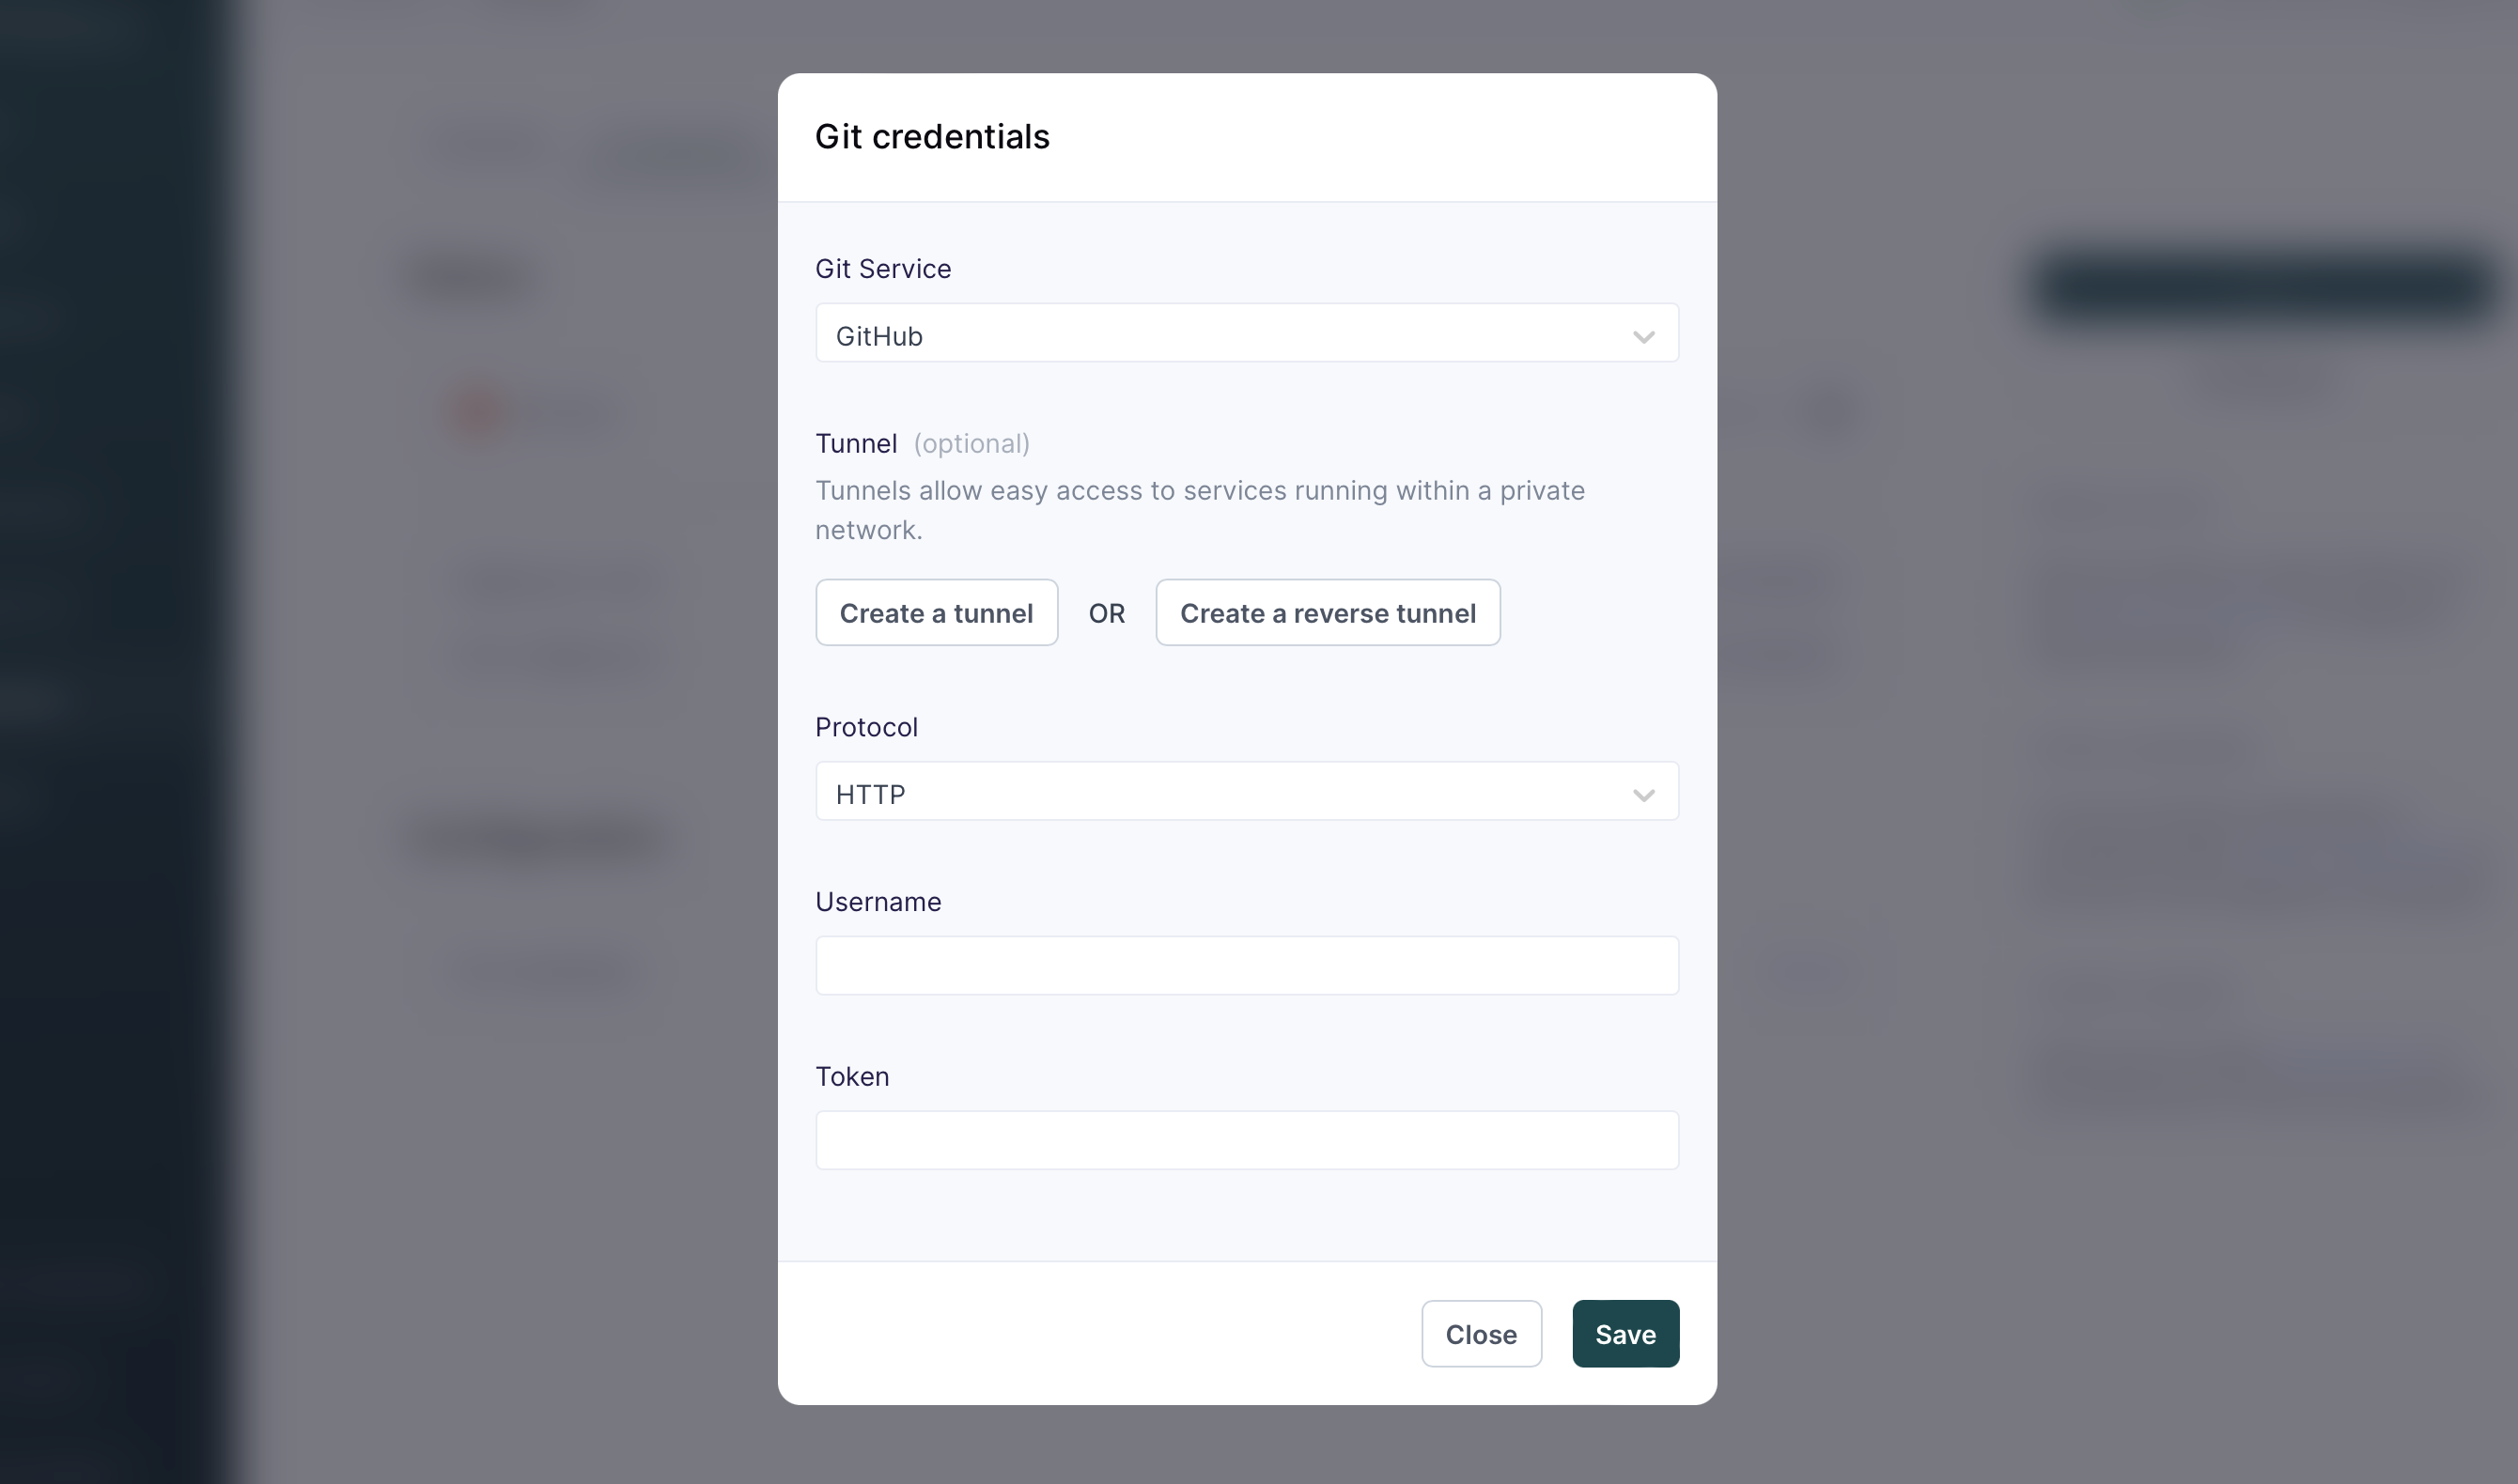
Tunneling
If you want to use a Git repository that's hosted on your on-premise server without public internet access, you can use tunneling to connect to your Git server. Once you've set up the tunnel, Hightouch uses it to connect to your Git repository.
-
Go to the Tunnels tab on the Settings page, and create a tunnel or reverse tunnel that connects to your Git server. Refer to the tunneling documentation for further instructions.
-
Go to the Git Sync configuration page and click Manage next to Git credentials under Configuration. Add your credential and select the correct tunnel to use.
It's recommended to choose SSH protocol and ssh_privatekey to connect to a Git repository, as basic auth may have problems forwarding the authentication header through an ssh tunnel and HTTP redirects. You can find more detail in the GitHub documentation on how to use ssh protocol to authenticate. Hightouch doesn't support ssh_privatekey with passphrases.
Next steps
From here, you have the full power of Git in your hands. Here are some potential ideas to try next:
- Create a new model by copying an existing model and changing the name and query
- Create a new model and sync at the same time
FAQ
What does the Full resync button do?
Clicking the Full resync button runs an outbound sync for all syncs and models in the workspace. This action pushes all workspace syncs and models to Git and then pulls changes from Git back to your workspace, in that order.
If your Git repository has changes that aren't yet reflected in your Hightouch workspace, clicking Full resync overwrites those changes.
Recreating a deleted YAML file
As explained in the Git Sync configuration section, this extension doesn't support deletions from Git. If you delete a YAML file in Git, the corresponding model or sync remains in Hightouch. The file won't be rewritten to Git until the next change in Hightouch, or unless you trigger a full resync.
If you want to recreate a deleted YAML file in your Git repository, click the Full resync button. If you want to do this manually, you can create a new YAML file in your Git repository with the same file name and schema as the original one. Hightouch understands that it refers to an existing model or sync and it associates the new YAML file to the existing resource.
Protected branch update failed
If you selected a protected branch in your configuration, your Git Sync setup might fail with this error: Protected branch update failed - Changes must be made through a pull request. To resolve this, select a different branch that isn't protected and create pull requests in GitHub to merge the updates to the protected branch.
Otherwise, you can see our instructions here for how to use Hightouch Git Sync with branch protection.